Why Concrete Patio Installation Transforms Your Outdoor Space
Concrete patio installation creates a durable, low-maintenance outdoor living area that can last up to 30 years. The process has four main stages: site preparation, building forms, pouring and finishing, and curing. Costs typically range from $4 to $30 per square foot, depending on size, thickness, and finish options.
Key Installation Stages:
- Site Prep- Excavate 8 inches deep, add 4-6 inches of compacted gravel, create 1/8-inch per foot slope for drainage
- Forms- Build 2x4 lumber frames, square corners using 3-4-5 method, stake every 3 feet
- Pour- Add reinforcement (rebar or mesh), pour concrete, screed level, float surface, edge and finish
- Cure- Keep moist for 3-7 days, cut control joints every 8-10 feet at 1/4 slab depth
Concrete offers incredible versatility beyond a gray slab, with options like stamped patterns, colors, stains, and exposed aggregate textures. It provides a solid foundation for entertaining, adding property value, or creating a functional backyard space.
The decision between DIY and professional installation is significant. Pouring your own patio can save 40-50% on labor, but it requires proper technique to avoid costly cracking and structural issues that can rival the original project cost.
I'm David Shelly, and with nearly two decades of experience in design and installation since 2005, I've completed countless concrete patio installation projects. My experience has taught me that quality craftsmanship is the difference between a patio that lasts three years and one that lasts thirty.

Planning Your Patio: Costs, Designs, and Key Decisions
A successful concrete patio installation starts with a solid plan covering benefits, costs, and design. Concrete patios are a long-term investment, lasting up to 30 years with minimal upkeep. Unlike wood decks or pavers, they only need occasional cleaning and sealing. This durability and low maintenance create a valuable outdoor living space that boosts your home's property value.
Forget boring gray slabs. Modern concrete offers incredible design versatility. Options include stamped concrete mimicking stone or wood, colored concrete for earthy or cool tones, rich translucent stained concrete, and textured exposed aggregate finishes.
The average cost for concrete patios is $4 to $30 per square foot. The final price depends on size, thickness, and your chosen finish. For example, a basic 400-square-foot patio might cost $1,600, while one with premium decorative finishes could reach $12,000. Labor is also a significant factor.
Here's how concrete stacks up against other patio materials:
| Patio Material | Average Cost per Square Foot |
|---|---|
| Concrete | $4–$30 |
| Brick | $4–$8 |
| Flagstone | $15–$30 |
| Gravel | $1–$4 |
Concrete sits in a sweet spot, offering more permanence and design options than gravel or basic brick at a more affordable price than flagstone.
Standard patio thickness is 4 inches, which is fine for furniture and foot traffic. For heavier loads like a hot tub or outdoor kitchen, increase the thickness to 6 to 8 inches. Building it right the first time prevents costly repairs from cracking and settling later.
Professional concrete patio installation vs. DIY
Should you do it yourself or hire a pro? Hiring a professional offers expertise, the right equipment, a warranty, and faster completion. The main drawback is the higher cost, with labor often accounting for 40% of the project.
A DIY approach can save 40-50% on labor and gives you full control. However, it's physically demanding and carries a high risk of errors. Mistakes in drainage, reinforcement, or finishing can lead to cracks and settling, and there's no warranty to fall back on.
Tools and Materials for a DIY concrete patio installation
If you're committed to DIY, gather these items before you start:
For tools, you'll need a shovel, wheelbarrow, measuring tape, level, and stakes for layout. A tamper or plate compactor is crucial for the gravel base. For finishing, you'll need a screed board, floats, an edger, a groover, and a stiff-bristle broom. Always use safety gear like gloves, glasses, and boots.
For materials, you'll need concrete(ready-mix is best for large jobs), compactible gravel for the subbase, 2x4 lumber for forms, and reinforcement like rebar or wire mesh. You'll also need expansion joint material, form release agent, plastic sheeting for curing, and concrete sealer.
Learn more about our concrete services if you decide professional help makes more sense for your project.
The Complete Concrete Patio Installation Process
Now that you've planned your project, let's walk through the concrete patio installation itself. This is where your backyard change happens.

This section provides a step-by-step guide. If you'd like to learn more about our comprehensive services, visit our dedicated concrete page: More info about our concrete services.
Step 1: Site Preparation and Excavation
Proper site prep is the foundation of a durable patio. First, mark the patio layout with stakes and lines. Remove sod and excavate to a depth of 8 inches(to accommodate a 4-inch base and 4-inch slab). Ensure the area slopes away from your house at 1/8 inch per foot for drainage. Finally, add 4 to 6 inches of compactible gravel and compact it thoroughly with a tamper. This subbase provides stability and improves drainage, preventing future settling and cracks.
Step 2: Building and Installing Forms
Forms act as a mold for your patio. Build them using 2x4 lumber, squaring the corners with the 3-4-5 method(a right triangle with sides of 3, 4, and 5 feet). Secure the forms with stakes every 3 feet and level them to maintain the drainage slope. Against existing structures like a house foundation, install a 1/2-inch isolation joint to allow for independent movement. Before pouring, coat the inside of the forms with a form release agent to make removal easier.
For more detailed guidance on this step, check out this helpful resource: A guide to building patio forms.
Step 3: Pouring and Finishing the Concrete
This step requires speed and precision.

Before pouring, place reinforcement like rebar or wire mesh in the middle of the slab's thickness. Fiber-reinforced concrete is an excellent alternative that adds durability.
Pour the concrete starting in a corner, spreading it evenly to avoid air pockets. Level the surface by pulling a straight 2x4 screed board across the forms. After the surface water (bleed water) disappears, smooth the surface with a bull float. As it stiffens, use an edger to create rounded, chip-resistant edges. For a non-slip surface ideal for outdoors, apply a broom finish by dragging a stiff-bristle broom across the concrete.
Step 4: Curing and Adding Control Joints
The final steps—curing and adding control joints—are critical for long-term durability. Curing is essential for concrete to reach its full strength and prevent cracks. Keep the slab moist for 3 to 7 days by covering it with plastic sheeting or misting it with water. Avoid walking on it for at least 3-4 days.
To manage shrinkage cracks, cut control joints. These planned grooves should be 1/4 of the slab's depth(e.g., 1 inch deep for a 4-inch slab) and spaced every 8 to 10 feet in a grid. This encourages cracking to occur neatly within the joints. You can cut them with a groover while the concrete is wet or with a saw after it has cured.
Long-Term Care: Maintenance, Repair, and Lifespan
With proper care, your concrete patio can easily last for its full lifespan of up to 30 years.

For routine cleaning, sweep away debris regularly. For deeper cleaning, scrub with mild detergent and water or use a pressure washer on a low setting.
Sealing your patio every one to three years is the most important maintenance step. A quality sealer protects against moisture, stains, and UV damage, preserving the look and integrity of the concrete. This is your best defense against damage from weather and freeze-thaw cycles.
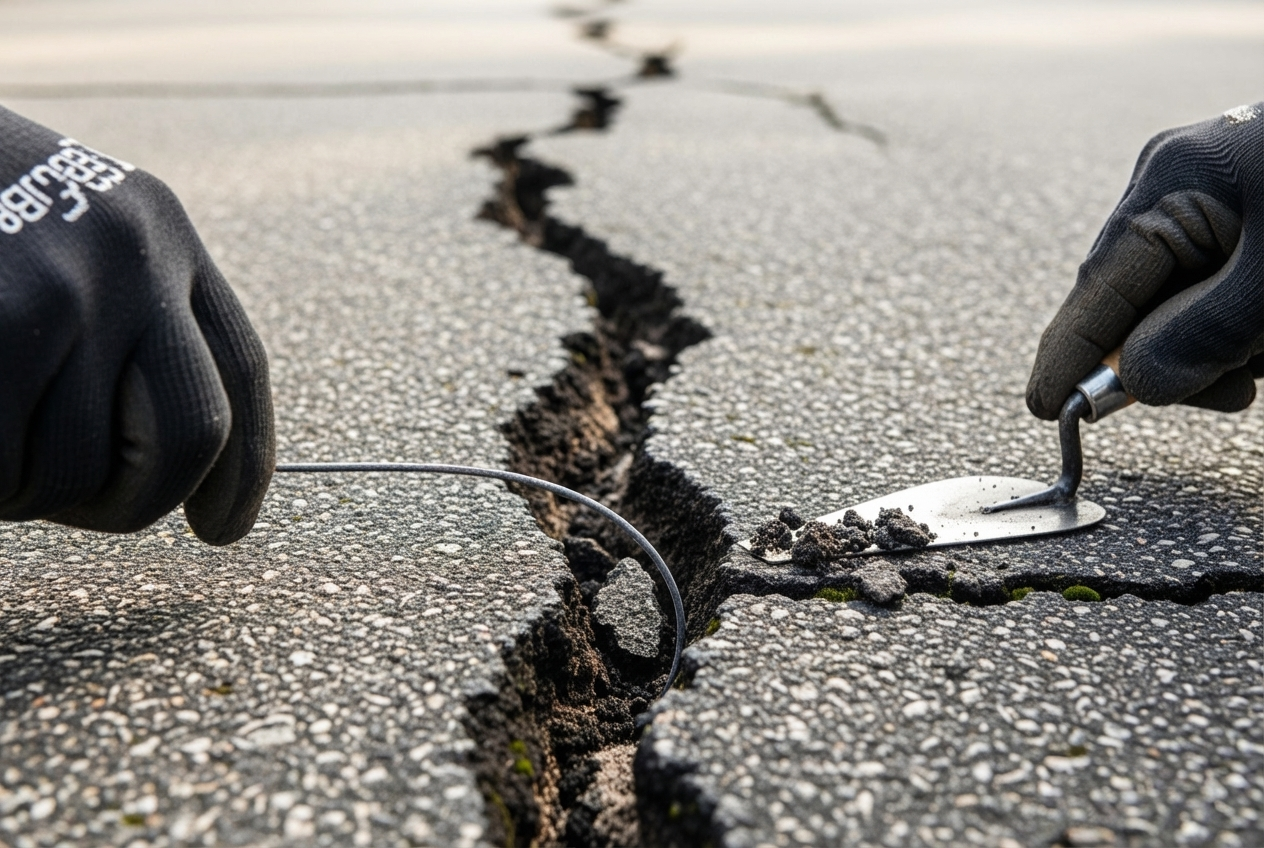
Don't panic if small hairline cracks appear. Repairing minor cracks is simple. Clean them out thoroughly and fill them with a concrete patching compound to prevent them from expanding.
A little attention goes a long way in preserving your investment. For professional help with maintenance, check out our comprehensive landscaping and maintenance services. We want your concrete patio installation to be something you enjoy for decades.
Frequently Asked Questions about Concrete Patios
Here are straightforward answers to the most common questions we get about concrete patio installation.
How thick should a concrete patio be?
A standard patio for foot traffic and furniture should be 4 inches thick. For heavier loads like a hot tub, outdoor kitchen, or a substantial pergola, increase the thickness to 6-8 inches. Regardless of slab thickness, a 4-inch compacted gravel base underneath is essential for stability and drainage.
Is it cheaper to pour my own concrete patio?
Yes, a DIY approach can save 40-50% on labor costs. However, you must account for tool rentals, material costs, and the intense physical labor involved. Professional installation offers expertise, speed, and a warranty, which can prevent costly mistakes that might require expensive repairs later. It's a trade-off between initial cost and guaranteed results.
How do I stop my concrete patio from cracking?
While minor hairline cracks are normal, you can prevent major structural cracks with proper installation. Key prevention methods include:
- A proper subbase: A compacted gravel layer prevents shifting that stresses the concrete.
- Reinforcement: Rebar, wire mesh, or fiber reinforcement holds the slab together and keeps small cracks from widening.
- Control joints: These planned grooves are cut every 8-10 feet to direct cracks to occur in straight, clean lines.
- Proper curing: Keeping the concrete moist for 3-7 days allows it to gain maximum strength, reducing surface cracking.
Transform Your Backyard with a Professional Installation
You now have a solid understanding of what goes into a quality concrete patio installation. As we've covered, concrete is a smart choice for its durability, low maintenance, and design versatility, adding significant value to your home.
We've walked through the key stages, from site prep and forming to pouring and curing. The most important lesson is that planning and attention to detail are crucial for a long-lasting result.
While a DIY project is possible, concrete work is demanding and unforgiving. Our team's professional expertise, gained from years of hands-on experience, ensures the job is done right the first time, avoiding common pitfalls.
At Cascading Falls Inc., our "Whatever It Takes..." approach guarantees quality craftsmanship. We've proudly served homeowners across Roseville, Sacramento, and throughout California, building beautiful, long-lasting patios.
Your dream outdoor space is within reach. Whether you envision a spacious entertainment area or a cozy retreat, we can bring your vision to life.
Ready to transform your backyard? Contact Us today for a professional quote. For inspiration, Explore our concrete projects and see the quality we deliver. Let's build something beautiful together.